
DRAGON DOOR KNOCKER
So, I was getting antsy with very few blacksmithing commissions coming in so I decided to come up with a project to do. I contacted my Mentor Master Danr Ketilsmior who lives in Northshield (Wisconsin ) about doing a simultaneous project. I came up with the idea for a project and he came up with actual project. We agreed on Dragon Door Knockers, We would both make it and then compare notes at the end. It wasn't a competition just a motivation to make something together so to speak.
My first attempt, didn't go as I planned because once I roughed out the dragon part I hated it.

So I went back to the drawing board and found a design I really liked done by an old master smith from Black bear Forge.
The plan was to use mostly period methods for making it. I have a gas forge (which died right in the middle of the project and needed to be replaced at some cost). so that is my one allowance toward the modern.
I documented the whole process for the East Kingdom Blacksmith Guild as I challenged them to make one as well (or just a plain door knocker)
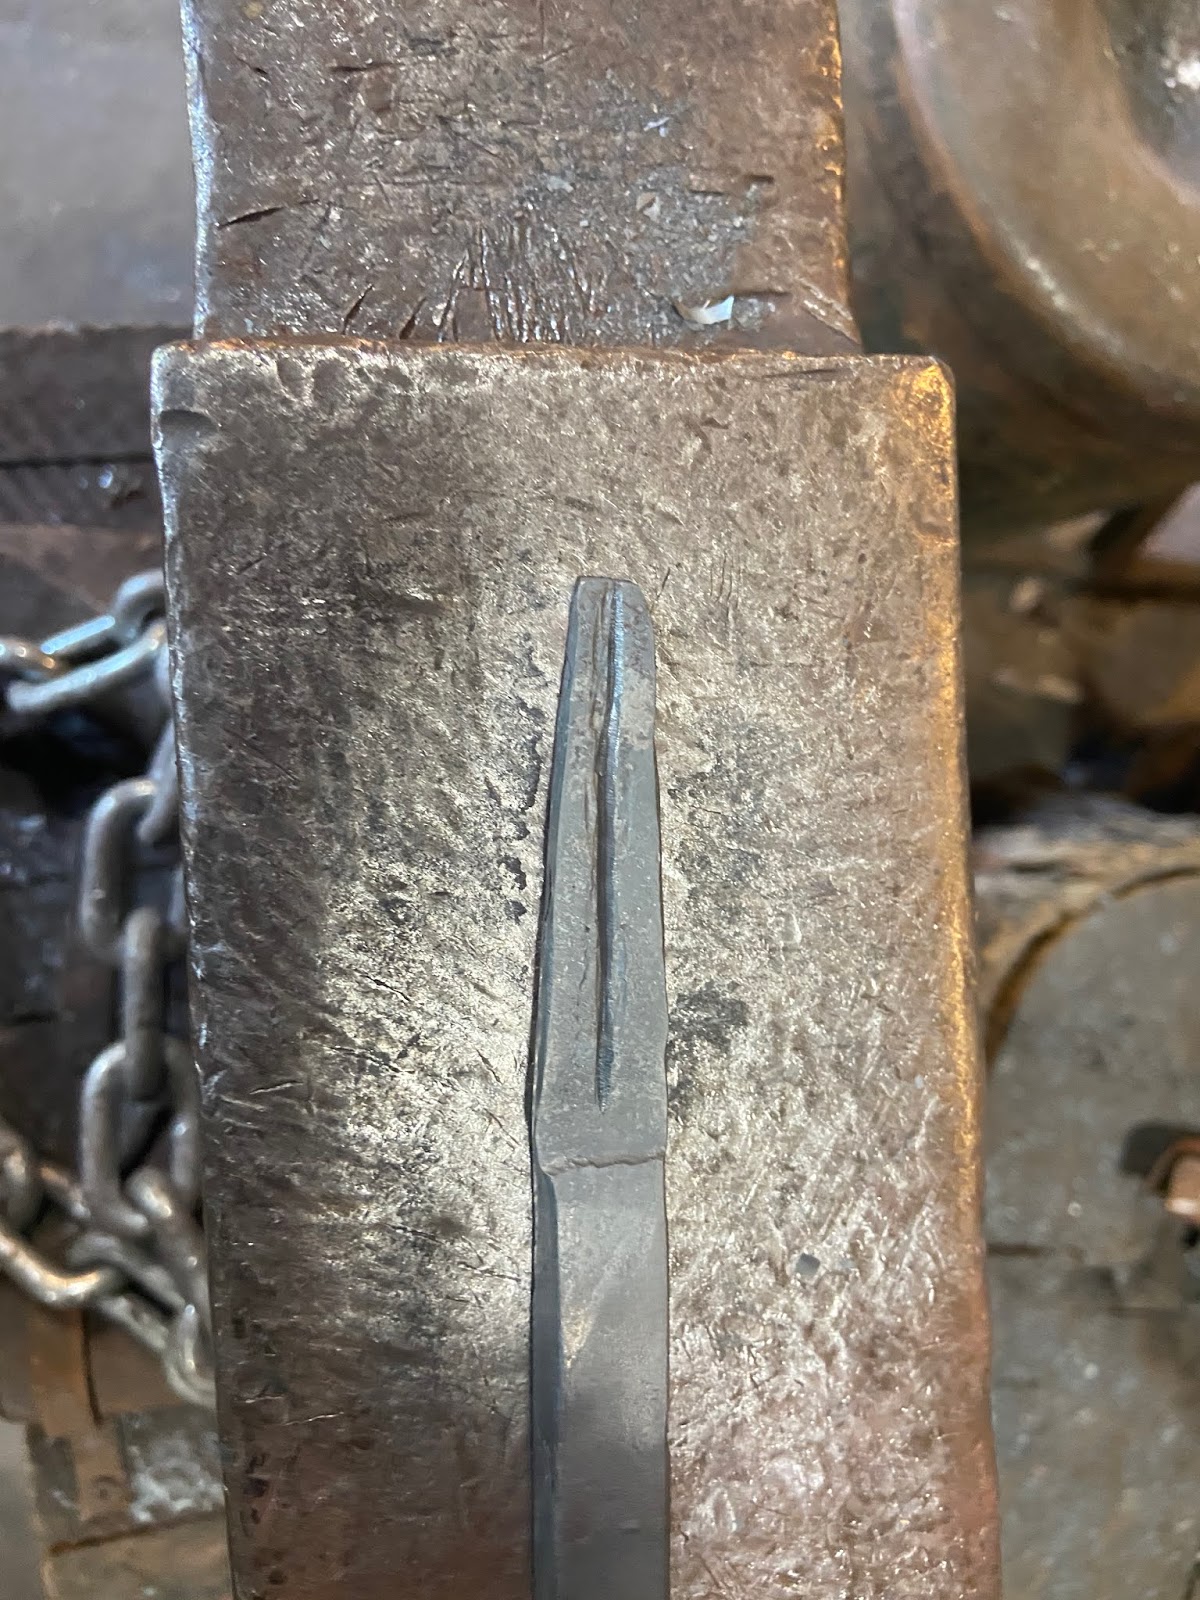
I started with half inch mild steel square stock. I began by drawing out what would become the horns. You hammer the stock on a slight angle, drawing it and at the same time turning it on its sides to keep the stock from bulging out sideways. Once had it drawn out where I wanted it I used my hot chisel to split down the middle. Once it was mostly split, I heated it back up in the forge and used a sharper chisel to clean up the slit.


Next step, I bent the horns back on the steel to create a nose area. I forge welded the bend to make a clean connection. It was not as successful as I had hoped as my forge was on its way out and I could not get it all the way up to a solid welding temperature.
So, I was getting antsy with very few blacksmithing commissions coming in so I decided to come up with a project to do. I contacted my Mentor Master Danr Ketilsmior who lives in Northshield (Wisconsin ) about doing a simultaneous project. I came up with the idea for a project and he came up with actual project. We agreed on Dragon Door Knockers, We would both make it and then compare notes at the end. It wasn't a competition just a motivation to make something together so to speak.
My first attempt, didn't go as I planned because once I roughed out the dragon part I hated it.

So I went back to the drawing board and found a design I really liked done by an old master smith from Black bear Forge.
The plan was to use mostly period methods for making it. I have a gas forge (which died right in the middle of the project and needed to be replaced at some cost). so that is my one allowance toward the modern.
I documented the whole process for the East Kingdom Blacksmith Guild as I challenged them to make one as well (or just a plain door knocker)
I started with half inch mild steel square stock. I began by drawing out what would become the horns. You hammer the stock on a slight angle, drawing it and at the same time turning it on its sides to keep the stock from bulging out sideways. Once had it drawn out where I wanted it I used my hot chisel to split down the middle. Once it was mostly split, I heated it back up in the forge and used a sharper chisel to clean up the slit.


Next step, I bent the horns back on the steel to create a nose area. I forge welded the bend to make a clean connection. It was not as successful as I had hoped as my forge was on its way out and I could not get it all the way up to a solid welding temperature.
After finished the bend I used the blacksmith’s guillotine to fuller the neck down before starting on the head. It would be much more difficult to do once the head was made. I did the same for the tail leaving room for the center pivot hole. I then forged in the tail and flattened the center for the pivot hole.
Next I worked on the head. I’ts easier to clamp it in the jig while its mostly straight.

Next using a round punch I drifted the pivet hole.
Once I had the hole finished, I needed to buldge it out on the back side in order for it to act a fulcrum. I did that by inserting a quarter inch rod in the hole, heating up the piece and hammering it down into a gap in the vice

 .
.
Next I used the horn of the anvil to put the bends into the top and bottom. It was important for both bends to line up with each other to ensure that they picot will work and the door knocker will actually knock.
Once I had the hole finished, I needed to buldge it out on the back side in order for it to act a fulcrum. I did that by inserting a quarter inch rod in the hole, heating up the piece and hammering it down into a gap in the vice


Next I used the horn of the anvil to put the bends into the top and bottom. It was important for both bends to line up with each other to ensure that they picot will work and the door knocker will actually knock.

Next part of project was to make the plate, the knocker button (for lack of a better term) and the pivote plates. I made the main plate and pivot plates out of eight inch be two inch flat stock. I made the button out of three eighth inch square stock.


I use the guillotine again to put fullers in the top and bottom of the plate. I drilled a hold for the buttom stem and flat riveted the stem on the backside the plate.I used a chisel to hot cut the slots for the pivot plates. I then did the same flat rivet technique on the pivot plates as well.
Bedore I assembled the whole thing I added scaling to the neck and tail and a ball peen stippling effect to the plate for some texture. That was followed but hours of hand sanding with 40, 60, 220 and 1000 grit sandpaper.
Next cam assembly. I I used a quarter inch steel rivet to secure the Dragon to the plate. That went pretty smoothly.
Next I used a clear powder coat on the whole thing to keep the weather from destroying it (my only other modern day technique).


The powder coat added a nice sheen to the sanded edges. All that was left to do was mount it to the door.
Next I used a clear powder coat on the whole thing to keep the weather from destroying it (my only other modern day technique).


The powder coat added a nice sheen to the sanded edges. All that was left to do was mount it to the door.


