15th Century Hinge Project
Lord Brandr Aronsson
This is a project I have wanted to tackle for quite some time, but I never had the time to devote to it. This is a 15th century Oak cupboard from either the Netherlands or France and it currently resides in the Metropolitan Museum of Art’s Cloisters Collection. I have been fascinated by the hand forged hinges on this piece for years. It is a multi-piece project. First you have cross hinges which make up the center hinge on each door. Second will be the decorative arms on top and bottom of each door, which I believe has a whole story of its own, but we will get into that for part two of the project.
The center crossed hinge are made up two 2” x 3 1/16” (roughly) of flat mild steel. Mild steel is iron with just enough carbon to be able to form shapes without splintering like wrought iron but not enough carbon to hold an edge for a blade.
I spent a lot of time trying to figure out the process of just how the Master Smith who created these did it.
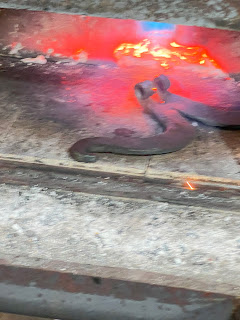
My first attempts which seemed sound at the time ended in epic failures. My first thought was that he drew out both ends and created the hook before doing anything else. Then I thought he bent it in on itself and created the curves after that. So, I attempted that.
I did not get quite the result I had seen in my head.
Next, I thought of different technique where you draw out the ends like the first attempt but instead of trying to fold sideways, fold it over on itself, then use the hammer and heat to flatten it into place, then curve the arms.
Here is the result of that.
Epic fail number two. By this point I was getting rather frustrated at what in my mind should have been time consuming but ultimately doable project.
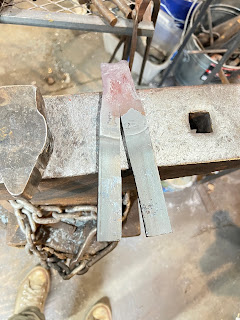
So, I took a breather and sat back down and looked at my myriad of photos of the hinges. Then the light bulb over my head went off. Sometimes the most obvious and easiest solution is the answer when you stop and think. So I took a ten-inch piece of 3/16” x 2” flat stock and made a six inch cut with a hack saw down the middle of the piece leaving four inches for the flat and the hinge, and voila that is how they did it.
The first thing I did was to fuller the hinge end (Fullering is the process of expanding and shrinking the metal at the same time) to create the right size mass for the hinge, which will be hot rolled around the hinge pin for a perfect fit.
Once the tail end was the width and length I wanted. I turned it around and started working each of the arms down to the right size point and then creating the curved end.
Once the curved ends were formed, then came the hard part. Due to the thickness of the material, creating the recurve took some muscling and coercing of the steel, but eventually I made it obey my will, (there was some colorful language involved) and the recurve was formed.
Making these types of curves on flat stock is not as easy as it seems, as the steel really does not want to bend that way. So, there is a technique for fooling the steel. You heat the metal and hit the opposite direction almost folding it in half. Once that is done you heat it again and then using the anvil you flatten the bend and that gives you most of your curve. This takes a number of heats as you have to deal with the excess steel that builds up around the curve as seen in the previous failed attempt. However, the technique worked just fine here and I got both halves of the hinge drawn out, and cleaned up with a hot rasp.
The next step was to create the actual hinge. Hinge making is a basic blacksmithing skill which is something all blacksmiths learn early on. The hinge design on this project is a standard slip pin hinge.
The process involves heating the flat (and hopefully you have given yourself enough room to create the hinge roll.) You start with the face of the hinge facing down so that as you hammer down and across the steel you are creating a cup that will be facing up once you flip the piece and then that creates your hinge roll.
Once you have created matching rolls on each half of the hinge, you mark it for cutting. One side will have a center loop and the other side will have a space. It’s always a good idea to leave a little more room in the space so the hinge can swing freely.
Using a hack saw, I hot cut the pieces. Cutting away for the center loop is easy. Cutting away the center is a little more involved. You have to cut your slits then heat it up and using a hammer and chisel hammer the center piece out of place to ninety degrees. Then you can use the saw to cut off the excess.
Once that is done, you can fit the to halves together. You might need to do a little adjusting. With these it was just a little tight. So I put the split back into the forge and heated it up.
Using a wooden mallet so as not to deform the metal, I tapped it into place, and it made a perfect fit.
The next thing to do was to drill the holes for the nails and forge a pin for the hinge.
The last thing to do before mounting the bracket was to treat the entire piece with beeswax to keep it sealed.
This project was a lot of fun. It was also quite challenging at times, and I had to utilize some new techniques to create the final piece. Considering that a hinge in general is a fairly utilitarian object, its amazing how much we rely on them Without hinges, doors don’t open, trunks don’t open and shutters don’t open. Decorative hinges are a luxury and these particular ones were most definitely custom work from the local blacksmith.
The next part of the project will be the upper hinge and arm support.
What I find most intriguing about this part of the set is that after many hours of scrutiny it is clear to me that the three sections of the design were added over time with the different sections having been brazed onto the existing piece.
However, that is for another time.
Provenance – The Metropolitan Museum of Art, Cloisters Collection
Bequest of Susan Vanderpool Clark 1967 (67.155.9)


No comments:
Post a Comment