Wednesday, January 23, 2019

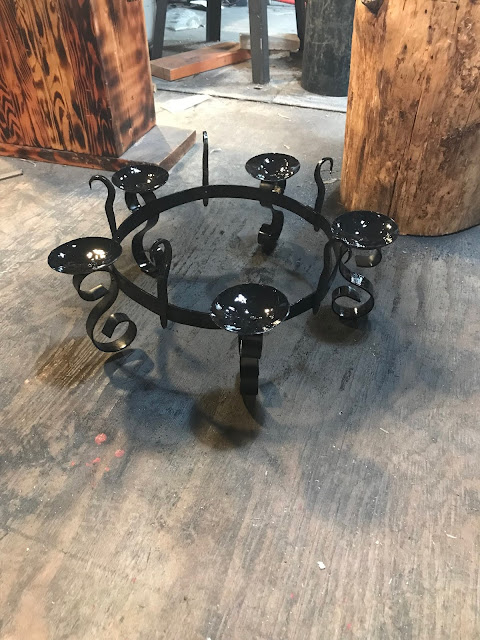
Oil Lamp Chandelier

Steel Oil Lamp Chandelier


So I have been wanting to try making a larger project and something decorative. So i had the idea of making an oil lamp chandelier. About two years ago we swapped all of our candles for oil lamps in our main pavilion at Pennsic. We never found a good alternative for a hanging oil lamp chandelier, so
i decided to make one. I had an idea of the design I thought would be useful and relatively evocative of a period design. 

This particular design was going to force me to take a on a few skills which i have been working on but have not yet mastered. Scroll bending can be quite a bear, especially if you want them all too be the same size. I thought i has solved this problem by buying scroll bending jig for the shop. Apparently this jig is less than happy bending stick over a half inch wide. So while i got a basic scroll from the jig i had to fix them all on the anvil. 

The next obstacle was forging the ring in my gas forge which is not really meant for forging something that large. Then creating the ring itself. So i heated the steal up one section at a time and lacking any sort of circle jig of the correct size, we (my assistant and I) wrapped it around the anvil stump which was mostly round. Once it was close to round and closed i used an acetylene torch to heat the rough spots and round them out on the anvil. 

Next came the receptacle cups.. I started with 6 inch stainless steel discs. I heated them up in the forge and using a swage Master Danr had made out of an oxygen tank, I formed the discs into cups.

The hooks were made from 1017 mild steel. As was the hanging ring which I forged and welded shut. 

Once all the pieces were fabricated, assembly would have been easier with two people. That being said i learn a few lessons with regards to riveting multiple pieces of oddly shaped metal together. Firstly build a jig. Build two jigs if necessary. It would have gone faster and cleaner if I had the right jig to rivet against. All in all the pieces went together as planned. 

I'm pretty happy with the end result, though I know I could have done so much better and I will on version #2. 


Monday, January 7, 2019

What To Do With That Pesky Horn

A Horn Holder of a Different Color (shape).

So i have been using the same drinking horn since my second year in the SCA, roughly 19 years ago. I love this horn, I have never found one with same dimensions that fit so well on my belt and hand. The problem is where do you put it when you have liquid in it that you have not yet consumed? 

I had seen a few options most of which required the horn to be placed in some kind of cradle horizontally. That did not work for me for a number of reasons. 
1. It takes up too much real estate on the table. 
2. It's ugly.
3. It's ugly.
So I decided to tackle the issue on my own as all good viking blacksmiths would do. I wanted something that would hold the horn upright so all the liquid would remain in the horn. I also wanted it to be of a design the would work with almost any standard SCA type horn. After a few attempts I settled on the design above. It is versatile, works with virtually any horn and is as much a piece of art as a useful implement.  For those with a larger horn, the horn holder is scalable, as seen with this gigantic horn from Canada.


But wait there is more. Not only is it scalable but it is mountable as requested by a friend of a friend.


Sunday, January 6, 2019

A Royal Commission


We had the joy of  merchanting in the easy bake oven that was EK50. It was a lovely event, especially when you choose to bring a forge with you. In the course of our first day there I had the unmitigated pleasure of running into my good friend Duke Rurik. He was in turn showing the King of Aethelmearc around the merchant area. The king was looking for an anniversary gift for his wife; which was the following day. I know royalty can be busy and things can fall through the cracks.

His Grace brought the King to my booth and he asked me if I could make a small blade for his wife, the Queen of Aethelmearc. 

EK50 was a bit of a question mark for us and we did not know what to expect, so we brought a little of everything except knife making materials or tools. We figure to do mostly blacksmithing and some commissions (which we did a number of) nothing to make a fine blade nor the tools to make one. However not being one to say no to royalty, and the idea of a knife as an anniversary gift made my heart go pitter patter, I said yes of course!

The design we decided on was a small scramasax. I knew he needed it by the next afternoon. We agreed on a price and I got to work. This was about four in the afternoon on Friday. The only steel I had to work with was a high carbon railroad spike I brought just in case I had time to start on a spike knife.
I also brought no grinders except for our angle grinder we use to cut steel with.

So i spent the next three hours hammering this spike down to the size blade shown in the picture. I normalized it  and let it sit until the morning. On the way back to our hotel I stopped at Lowes and picked up some grinding wheels and sand paper to finish the knife in the morning . I also picked up a small bucket and some vegetable oil so I could quench harden the knife.

The next morning I oil quenched the knife and hand sanded the finish with various grits of sand paper. The one positive was that the king wanted to put his own handle on the knife so all I had to do was finish the blade. I used the angle grinder to put in a rough edge and then 400, 800, and 1200 grit to hone the edge sharp, I stropped it  on my shop apron and the thing was ready jut as he came to get it.

I believe he liked it based on his smile and many thanks. It was definitely a fun and slightly stressful project.


Monday, December 31, 2018

Needle Pendant


While we were at the holiday fair this past December a very nice woman
came to the booth and inquired whether or not i could make a needle
pendant for her. I thought she just wanted a representation of a needle, 
but I was mistaken. She showed me a photo of an actual needle pendant. 
I said of course, because you always say of course. Though to be honest 
I didn't think it would be too hard to make. 

I already had some nice 3/16th stainless steel round which i had been
making various items out of so i began with that. The most difficult part
was drifting a hole in the flat, creating the "Needle Eye" without 
ripping it to shreds. The first one was an epic fail. The second one
was less so. 
THE EGG SPOON

The Egg Spoon was an interesting project. I was informed by a friend 
about this Egg Spoon that was all the rage in Berkley California. He sent me 
the link and I was summarily horrified to find out that this Chef in Cali
had been profiled on 60 Minutes and made an egg (a single egg) over
a log fire in her kitchen using an Egg Spoon. I was even more horrified 
to find out you could purchase said Egg Spoon for $250 from a very 
shrewd blacksmith in San Fransisco.

I looked at the pictures of this magical spoon and figured I could make it in 
about an hour. So I went out to the shop, and made it in about forty minutes. 
The one thing I noticed about the design of he original is that he riveted 
his handle to the inside of the bowl. Most traditional spoons of this 
style rivet the handle below the bowl for stability. Even though I knew
it was structurally incorrect,  I made an exact replica of the famous 
Egg Spoon.  

We brought it with us to various events and while many people enjoyed 
the saga of the Egg Spoon no one wanted to buy it. In fact we actually made an 
egg in it at the EK 50 Event using the forge. It was a rousing success. 

Finally at Pennsic someone was looking for a giant Chili spoon and
 though the Egg Spoon was the right size but needed a longer handle. 
Very quickly the Egg Spoon became a chili spoon with the handle
 riveted correctly and all was right with the world.


Banner Stands


I make custom banner stands. The one on top was a commission we got at
the EK50 event to be delivered at Pennsic. The woman had no preference
as to what it would look like. She had mentioned something simple
but that just allowed me to make what I wanted.

The black and gold stand was a gift from me to a dear friend who has been a 
big supporter of my work who was about toe receive her Laurel. Her persona
is Italian Renn, and FLeur De Lys is her arms. I wanted to make her something 
very special. The finished version is actually version #4 as making the
 Fleur de Lys and attaching them to the stand took some working
and reworking. The final version and the necessity for a finished  stand 
in time for her peerage led me to thinking outside of what i had initially 
planned and led me to using the gold wire wrap to attach the arms and the 
Fleur de Lys. Which in turn led to the over all design theme of the 
wrapped wire, Sort of a happy accident.


Flesh Hook


This past Pennsic I had a number  of interesting opportunities to make some 
things i had never made before, nor heard of before.  A woman came in and 
asked if i could make her a flesh hook. I had never heard of a flesh hook 
before and the name definitely conjured images that were not all together 
pleasant.
 Apparently it is an historical tool for grabbing large
hunks of meat out of stew pots. So i did some research on Ye Olde Google
and found some images. The most difficult part of making the flesh hook
was the offset hooks. The first version I made had a design flaw in that the 
rear hook folded over on itself which would create a space where food could 
get stuck and not easily cleaned.  The second version was made with that that
fold and was a success. 
The woman I made it for loved it so much she suggested i keep it in my 
booth for others to see and order.  

Norse Era Slide Lock and Hinges This is a project I have been wanting to take on for a very long time. So when my  Laurel suggested I make a...